Deadprogrammer Visits The Radiator Planet

If you live in New York, chances are pretty high that you live in an apartment building. We, young generation X-ers, face a tough choice. To be able to afford a house without Google stock options, you need to move either to New Jersey (technically ceasing to be a New Yorker) or to Staten Island. Which is a fate worse than death. The rest, find refuge in the bajillion of apartment buildings on the Isle of Long or in Manhattan itself. There are also some in Jersey City, Queens and the Bronx. Apartment living is a reality for most Manhattanites and card-carrying members of the Bridge and Tunnel society, such as myself.

I don’t think I’ve ever seen central air heating in a New York apartment. Apartments here are heated with radiators. Radiators are noisy, prone to overheating and generally troublesome. As the heating season is about to start, let me share with you my wealth of radiator knowledge.

There are three major heating system types common to the New York area: water, one pipe steam and two pipe steam. Only the oldest buildings have water heating, if you have one of those, you are on your own. I’ve never seen a two pipe steam system either, so the only one I can tell you about is the almost century-old technology – the one pipe steam radiator with a Hoffman valve. It’s very, very likely you have one of these.

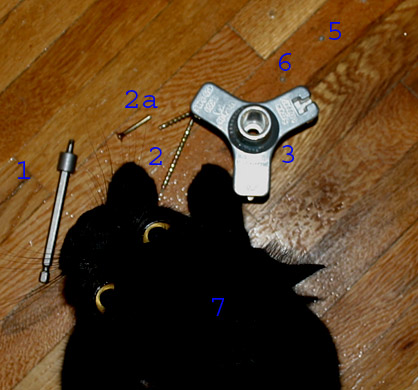
In this picture Gary the cat shows you what a typical single pipe system looks like. It’s basically a steam-carrying pipe sticking out of the floor, connecting with your radiator via a valve. A mistake that most people are making, is thinking that by twiddling with this valve it’s possible to control the temperature. This is absolutely wrong. In theory, you should be able to open and close this valve to start or stop the flow of steam. In practice, as most of these are very old, the gaskets don’t hold steam at all even in the closed position. Closed and half-open position usually does not result in much other than noise from the condensed water that can’t get back down and leaks.

This heating system is very simple. Steam enters the radiator through the pipe, condenses as water and leaves down the pipe. It has numerous advantages: steam is more efficient than heated water, there’s next to no chance of the system freezing (when that happens to a water-heated radiator on the coldest day of the winter, it’s not a lot of fun – just ask Joel). Steam radiators like this existed in Victorian times as well, with one exception. They tended to explode if too much pressure was applied, maiming and killing hapless apartment dwellers. That’s why so many brownstones have water-heated systems.

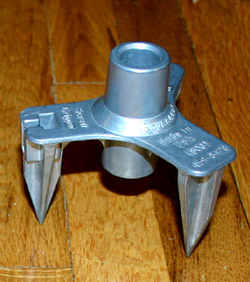
In 1913 George D. Hoffman started a company that produced an ingenious little device that made steam radiators safe. If you look at your radiator, you’ll find a little vent that usually looks like a miniature rocket ship (as you can see both my radiator and the valve have Streamline / Art Deco styling very popular in the period when my building was built). Chances are, it will be a Hoffman Specialty Model 40. This device works like a not very bright Maxwell’s demon: it lets air enter the radiator or escape, but stops steam from escaping.

The whistling noise that you hear at night is air escaping the radiator when it fills up with steam. If the vent is not correctly sized or, which is more frequent, got clogged up with mineral deposits, you will hear water and steam spurting out of it and destroying your neighbor’s ceiling. Worst case scenario – the valve gets stuck on open and fills your entire room with steam, ruining the walls and possibly burning you. When changing a clogged valve, make sure that the steam is off and is going to stay off while you change it, and be around when the steam is going back on to make sure that there are no leaks.

Even if you have a properly sized and regulated valve and you pitch the radiator towards the pipe to let the water drain without making much “water hammer” noise, it’s likely that your apartment will be overheated. Most are. As the intake valve is usually out of commission, the best way to turn off the radiator is to close the steam valve by turning it upside down (I’ve heard about this trick on This Old House. This is rather inconvenient and a bit dangerous – you might strip the threads and end up with a whole room full of steam. My guess is that there would not be an explosion as the valve is engineered to open if the pressure is excessive. Maybe not, I don’t know.

The best thing to do is to purchase a regulated thermostatic valve. These are improved valves with a sensor that closes the valve when the temperature reaches a certain level. While not perfect, these really let you exert a tiny bit of control over your apartment’s temperature. It also lets you easily shut down the radiator, as sometimes the buildings overheat so much, that you don’t need heat at all.

The kit usually consists of three parts: a temperature control device, an adaptor and a Hoffman-type valve. This will run you about $100 altogether. I have one on two radiators, and let me tell you, these are worth every penny.

P.S. I am rather curious as to what George D. Hoffman looked like and what his life story was. Somehow I imagine him as a fat dude in a three piece suit with some ridiculous Victorian hair and beard-style. If you ever find a picture of him, please let me know. All I could dig up was an old brochure (PDF) that featured the Hoffman company logo: “The Use of Hoffman Valves Make a Poor Job Better A Good Job Perfect.”


Ad:

Don’t you wish you could peer inside the walls to see if there are electric wires there, or leaking pipes? Well, now you can with a Fiberoptic Borescope for way under 200 bucks!

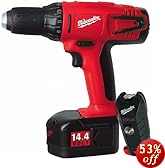
Milwaukee drills are some of the finest drills ever.

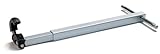
Basin wrenches are some of the most useful tools missing from most toolboxes.

WML : Screw You, Computer Hardware Manufacturers!

Continuing with the screw theme, let me share with you another piece of fastener lore that I’ve learned over the year. As any person who ever cut her hands on ragged edges of cheaply made computer cases knows, when you buy a filthy overpriced little baggy of computer screws there’s a weird and confusing variety inside.

Here are the most common, left to right: chassi screw, cd-rom screw, floppy screw and hard disk screw. Now here’s the confusing part – The hex headed chassi screw is a bit bigger than the very similar cd rom screw. But the soft metal of computer components makes it possible to use it to fasten everything – floppy drives, cd roms, hard disks. It is the most useful screw of the four. I get the feeling that the hard drive screw is just a tad bigger, which makes it almost as useful, but it will get stuck if you try to attach a floppy drive with it. The cd rom screw and the floppy screws are next to useless – without knowing the proper type of screw to use, most people already embiggened the holes with chassis screws, and the little cd rom screws end up pretending to go in, but then falling out. They end up filling up all the useful space in the little box where I store my accumulation of computer screws.

Since I mostly buy cases with motherboards already mounted in them, I am not going to delve into the whole plastic vs. metal motherboard standoffs. I’ll just mention that the metal ones sometimes cause shorts by themselves, and plastic ones are sometimes not strong enough to prevent shorts from flexing. There, I said it. Now I’ll merrily continue my screw rant.

But at least the computer screw weirdness makes peoples life harder not on purpose. But some fancy pants computer (cough Hpaq cough) and consumer device (cough TIVO cough) manufacturers use torx screws and tamper proof torx screws. For that exact reason I own a whole bunch of torx screwdrivers. That is a bit sneaky.

But not as sneaky as the hardcore tamper proof screws made by Tamperproof Screw Company of New York:

Snake Eyes®, which I see a lot in elevator button panels, Tri-Wing® that I hear is used in GameboyTM devices, OpsitTM, which is which is built to make mockery of the holy mantra of “Righty Tighty, Lefty Loosey” – it tightens conterclockwise (just like MTA lightbulbs). Тhere are other weird things like philips or torx screws with a pin in the middle and one way screws.

Also there seem to be a whole bunch of Pozidriv screws around. I think that the last cam out fiasco that I had was caused by me trying to use a Pozidriv bit on a Philips screw or the other way around. It’s very hard to tell them apart. Luckily I had screw drill out set similar to this one. It works ok on easy cases, but for every screw that I remove with it there seem to be a couple where I end up just completely breaking down the head of the screw leaving the rest under surface.

Wow, it looks like Philips screw company has special aerospace screws, like this wicked looking ACR Torq-Set. I would be way cool to get a box of those.

This is just like one of my favorite Russian sayings – “Ð?а каждую хитрую жопу еÑ?Ñ‚ÑŒ хуй Ñ? винтом. Ð?а каждый хуй Ñ? винтом найдётÑ?Ñ? жопа Ñ? лабиринтом”.

WML : Fasteners Are Engineer’s Best Friend

While we are on the subject of screws, here’s another thing that I learned about fasteners. As any know-it-all who pays attention to things like that I looked up why screws with what we called cross-shaped screws in the USSR are called Philips screws in the US (I wonder what they call them in other countries) are called so. Of course the answer was one web search away in the Straight Dope Classic Why did this guy Phillips think we needed a new type of screw?

I also purchased One Good Turn: A Natural History of the Screwdriver and the Screw used at Amazon. I learned that the screw and the screwdriver is a rather recent invention, interestigly enough one of the very few tools not known to the ancient Chinese.

Useless trivia aside, I hate both slotted and Phillips screws. Of course I would not even think of using slotted screws for anything other than period-correct Craftsman style or Art Deco hardware such as cabinet pulls or outlet covers. But the common Phillips screws, with their falling off from the bit (even the magnetic one) and stripping (not the good bachelor party kind) drive me absolutely nuts.

The solution? I bought a couple of boxes of hybrid Phillips/square screws from Rockler. You can use the regular Philips driver, or you can use a special square one. The benefit of a square bit is that the screw does not fall of the bit and does not strip easily. The kit also includes a bottle of suggestively named Rockler Screw-Lube. The paper box is rather sucky and unusable – the partitions lift up and the screws mix.

WML : Mr. Squeek No More

Here’s yet another edition of WML – What Michael Learned. And the subject of today’s post is one of the things that I hate as much as I love hardwood parquet floors – squeaks. In SAT-speak I am somewhat corpulent and nocturnal. And a sonorous squeak of a parquet floor in the dead of the night is not one of my favorite sounds. I am certainly not one of those people who think that squeakiness adds character to an old floor.

A few years ago I searched for a way to repair squeaky floors and kept finding advice for those who could access the floor from below – in cases of houses with basements that expose the underside of the upper floors. Then recently I found a solution in an episode of Ask This Old House that works for me. It is marketed as “Squeeeeek No More“. That’s right – 5 e’s. Luckily Google suggests the “correct” spelling even if you use less e’s.

I bought my kit over here. It came with 50 snap-off screws, a square driver bit, a special stud finder screw (he heh) and a depth control/snap-off tool that looks like a Klingon weapon or instrument of torture.

Here’s how it works :

First of all you shoo away the cat (7). Then you need to find a parquet plank that squeaks. You do that by first finding the general location of the squeek and then with your foot sideways pressing on individual planks. Usually it’s only one or two loose planks that generate the noise when they move. Each one of the planks is nailed individually and it’s the nails that make the sound . You don’t need to worry about finding a stud – just drill a few pilot holes (so that the wood won’t split). Then using the square driver bit (1) you drive the screw (2) a few turns into the pilot hole. Then you drop a depth tool (3) over the top of the screw and continue driving the screw into the floor with the driver bit. The driver bit has a fat section at the bottom which will prevent it from driving the screw further than necessary when used with the depth tool.Then you use a T-shaped hole in the depth tool to gently break off the head of the screw (2a) by rocking it side to side. The screw will break off under the surface of the wood leaving a small hole (5) and (6) in the floor that can be filled in with wood repair sticks.

I found that it takes about three to five screws per squeaky plank. The Klingon device is not really necessary for parquet floors without carpets.  The screw breaks easily with the tool, and doesn’t when you screw it in. It would be a good idea to practice on some scrap wood (which I didn’t do of course), but I’ve had no accidental snapoffs so far. It would become a problem if the screw would break off above the surface. I guess the best way to fix that would be to pound the crew in with a nail set (which is not an easy matter for sure).  If you do not predrill the hole a split in the plank would not be an easy fix as well. On the plus side, the holes are not very visible even unfilled. I guess the best time to do this fix would be right before floor refinishing.

There is a cheaper version of the kit marketed as “Countersnap“, which seems to be exactly the same thing, except the depth/snap-off tool that comes with it can’t be used on carpets. Actually I think that’s the one I’ve seen Tommy use on Ask TOH.

Of course this system will not work for people with radiant floor heating, pipes and electric wires that run under the floor, super expensive museum quality floors with highly polished astronomical mirror grade finishes and landlords who do not allow driving screws into the wooden floors no matter how squeaky you or the floor gets.

Oh, right. 50 deadprogrammerTM points to the reader who can tell me the sci-fi author who inspired the title.

WML: The Perfect Teapot

After some research and trial and error I finally found the best tea making device.
It’s a Bodum Assam teapot. It has two advantages over the clay teapots. First of all it’s clear. It makes it very easy to judge the strength of your infusion. Second, the french press like plunger filter stops the infusion process, yet you don’t have to take out and discard tea leaves immediately. One drawback might be that the tea cools down faster than in a clay pot, but I actually like cold tea.

By the way, I highly recomend Kitchen Kapers. I buy a lot of my kitchen gadgets from them.

WML : How to Good-Bye Obesity: Heart Rate Training. Malarkey? or Effective Way?

I am a hardened veteran of the battle of the bulge. There are a lot of factors working against me — genetic predisposition, laziness, sedentary lifestyle. Yet still, from time to time I wage a war on fat, and often enough come out victorious. I despise people who say that you should like your body the way it is. Body image hate is A-Ok in my book.

Generally I spent most of my life in various states of obesity. But three times I managed to bring my weight down to normal. The first time was when my parents signed me up for summer gym classes. Calisthenics and running 5 times a week for a whole summer really slimmed me down. Unfortunately the very charismatic coach we had ended up getting drafted into the Soviet army, and without motivation I stopped exercising and started gaining weight again. Then my dad got me into a tennis class. I got in only because he was a chief engineer in charge of building the stadium which housed the tennis courts where we played. I sucked at playing tennis, but by the time I left the Soviet Union my weight was back to normal.

American food, stress and more stress took it’s toll during my high school years. Still, one summer I took a gym class during summer school and took to running 10-12 laps around the stadium every day. My weight was back to normal again. But then I’ve got a job at Nathan’s Famous and gained a lot of weight eating free hot dogs and fries.

I never had any luck with diets up until now. Surprisingly enough Atkins diet really works. But of course it’s not enough. In fact, I lost 30 pounds and stalled. But then suggested that I try heart rate training.

There’s this company called Polar. They make very accurate pulse rate monitors. These monitors consist of two parts: a transmitter strap that goes around your chest and a watch which picks up the wireless signal from the transmitter.

The device continuously monitors your pulse so that you can adjust your effort level to stay in the fat burning zone. Luckily treadmills in the gym that our corporate overlord and beloved billionaire tyrant built for us already have Polar receivers inside. And as it turned out the gym attendants have transmitters available on request. You just punch in the desired heart rate and the treadmill adjusts to you. It also accurately calculates calories burned. And the overhead monitors are tuned into various Fox channels. Simpsons while working out — what could be better?

Running with heart rate monitor is just amazing. You don’t get too tired, but you know that you are exerting yourself just enough to burn fat. It’s very motivating. To keep myself further motivated I think I’ll buy myself an iPod when I loose another 10 lb.

If you were wondering, the subject line is a reference to the title of this book.

WML: How to Stop Biting Nails

As I mentioned previously, I’ve had some success with stopping nail biting.

I did not really start biting nails on my own. I picked it up from one of my childhood friends. You know, peer pressure. In fact, it was the same friend that cost me that front tooth which I will be replacing with an implant now. Two things to remember him by. Grrr.

I analyzed my nail biting and came up with the following conclusions:
a) I usually start biting a nail that is longer then the rest, has overgrown cuticle or jagged edges.
b) I bite my nails more when my hands are dry

Ok, so here’s how I stopped:

I went to a Dwayne Reed drugstore and bought myself a whole bunch of manicure stuff:

  • a couple of nail files
  • nail buffer
  • nail cissors
  • cuticle sissors
  • cuticle stick
  • Orly No Bite bitter clear polish
  • Sally Hansen Problem Cuticle Remover
  • Sally Hansen Radiant Hands, Nails & Cuticles Creme
  • Sally Hansen Maximum Growth
  • Sally Hansen Thicken Up!� Strengthening Nail Thickener

    First I took care of the dry skin. I really like that Radiant Hands, Nails & Cuticles Creme – it almost doesn’t smell.

    Then I took care of the cuticles with the cuticle cream and cuticle scissors.

    Polished away jagged surface of bitten nails and buffed their surface.

    For a weekend I used the bitter nail polish thingy. It’s wasn’t very bitter, but it reminded me.

    More importantly, I kept a nail file at work, in my bag, near my computer and at my bedside table. The hardest thing is to stop after biting a nail. By polishing away the jagged edge as soon as you transgress it’s easiest to stop.

    I applied the “Maximum Growth and Thicken Up” thingies from time to time. Nails that are bitten for a long time do not grow very well and are thin. These two products help a little with that.

    I think at some point I am going to get a manicure and a pedicure. Maybe it’s not very manly, but I am very secure in my masculinity.

    [update] Even after all that I was not able to quit completely. These days I can go without nail biting for up to a month at a time, but I am a full blown nail biting recidivist. That moisturizer really helps though.

    If you are coming from Lifehacker link, please don’t forget to take a look at the rest of WML posts and other good stuff.

  • WML: How To Remove Gum From Stuff or Goo Gone Guy – the Real Magic American ™ Hero.

    A few days ago I was very sleepy in the morning and sat right into a huge wad of gum that some asshole left in the middle of a train seat. The monstrous stinking blue glob firmly attached itself to my favorite Politburo coat. It was probably a couple of packs of Extra. I did not notice it until some guy pointed it out to me in a grocery where I was ordering some fried eggs for breakfast. Interestingly, he was the only person to mention that to me the whole day even though I was walking with a huge blue blotch on my ass the entire day.

    In any case, chances are pretty high, that when you ask somebody (even google) about removing gum, you will get a lot of stupid answers, the first one usually being “freeze it with ice”. You know, I am pretty sure that all those clowns have never tried removing gum with their methods.

    The first page stupidly recommends:
    freezing it
    egg whites
    peanut butter
    lemon juice
    vinegar
    WD 40
    mayonnaise

    The result of these remedies highly resembles what happed in this Simpsons episode.

    You know, when I worked as a porter in an apartment building, at some point I was tasked with removing gum from the sidewalk. My boss ordered a special spray (very similar to “canned air” spray used for dusting off electronics.The spray would freeze the gum, at which point it was supposed to become brittle and fall off. No such luck. The modern formula allows the gum to stay stuck even when frozen. And the spray achieved temperatures much lower than the temperature of ice.

    I’ve seen special crews with steam blasters cleaning gum off sidewalks of the Rockefeller Center. But even with high pressure steam they have to spend about five-ten minutes per piece of gum.

    In any case, the solution to my problem is very simple. There is a product that really works on gum. It’s called “Goo Gone StickerLifter ®”. It consists of petroleum naphtha (aka n-hexane ) and citrus oil. You see, it turns out that n-hexane dissolves most dry adhesives like there is no tomorrow. It’s not very smelly and not very toxic. And it dissolves in warm water + soap.

    Removing gum, dry glue and stickers is a pleasure with it. I took out the whole gum stain in a couple of minutes. I don’t know if “the enjoyment of this experience was “better than sex.” “, but the Goo Gone Guy might disagree.

    “Never fear, Retailer Man is here!”
    “Holy profit margin! It’s a truck load of Goo Gone!”
    “Oh, Goo Goone Guy you are a real Magic American ™ hero.”

    They don’t mention n-Hexane, but the Retailer Man is right about the profit margin though :)

    WML: Dude, I Am Getting a Dell

    Guess what? This post is going to be about microcomputers. PCs.

    I never owned a computer in the Soviet times. Not even a programmable calculator. I did have access to some old Wang clones called Iskra (Spark) in an after school program, played with a programmable calculator of a neighbour, played games on a frien’d PC, played games at my father’s friend’ work computer ( also PC), paid to play games on Sinclare computers that some enterprising people set up as a pay-per-play arcade, etc. Oh, I still remember the horror in the eyes of my teacher when I found a set of programs that calculated the level of contamination from a nuclear blast given the input of wind speed, bomb yeild and some other variables. Those Iskras were donated from the Red Navy.

    In the US, my father purchased a 386 for a humongous sum of $1300. It was put together in some computer shop on avenue U. That was in 1993 or 1992, I think. Since then, I’ve been upgrading my computer on the average once every three years. I think In all, I went through 3 cases, 6 motherboards and 2 monitors (not counting my wife’s computer). I never owned a brand name computer. After the second computer I’ve learned that I could be putting together myself.

    It seemed like a good idea at the time, putting together my own stuff. What could be simpler? Pop in a motherboard, a videocard, a modem, some ram, some hard drives — and you’ve got a box!

    I’ve become thoroughly familiar with what cuts from a ragged computer case feel like. I’ve learned how hard it is to be without the Internet when your computer is in pieces on the ground (and a driver needed to make the new hardware run is on the Internet, of course). There are very few types of flashable hardware that I did not have to flash. I accumilated a huge collection of computer screws, cables, cards and thermal processor grease.

    The questions that went through my mind were:
    Why are jumpers so tiny? (these days they have jumpers with little tails that can be taken out with just fingers)

    Why ide cables are so hard to deal with? (there are rounded cables available now)

    Why it’s so hard to find 0th pin on the hard drive connector? (newer ide cables come with a little peg that doesn’t allow it to be put in the wrong way)

    Which idiot came up with PS2 plugs? (one word – USB , well, ok, three words).

    And most importantly: WHY ALMOST NO PIECE OF HARDWARE, PORT OR CABLE COME WITH A LABEL THAT WOULD CARRY MANUFACTURER’S NAME AND A MODEL NUMBER????????????????????

    This is all slowly changing, of course, but the much bigger problem of minor factory defects and incompatibilities between chipsets still plague individually bought components.

    My last self-put together box – a dual processor PIII 1000 sucks ass. I could not get a single AGP video card to work with it. An IDE raid controller that worked ok on my previous motherboard wold cause all OS to crash. And finally, two little pegs that held the cooler on the processor broke, and I can’t keep PIIIs from overheating.

    I’d like to say, that after I’ve removed the raid card and put in a PCI video card, the system ran extremely steady for a year. Now it’s time to think about the future of my computers.

    So my resolution is this:

    1) Throw out the crappy dual processor motherboard and the crappy coolers. Buy a nice cheap and super steady single processor PIII motherboard + a stock Intel coolers and turn that computer into a file server. Four 120 Gig 5400 RPM drives (I don’t need the speed, and those drives run much cooler) should do the trick. The case of that computer is very nice and cool looking (it’s a square. It looks like this:

    Maybe I’ll even make the drives removable, but so far all removable racks that I’ve tried sucked ass.

    2) Buy a nice Dell workstation. That will be used for image manipulation and coding.

    3) Buy a big ass LCD monitor (or maybe one of those Sony 27″ CRT monitors) for use with the workstation.

    4) Buy a tablet pc for myself and a laptop for my wife.

    5) Donate or sell on eBay all the crappy hardware still sitting in my drawers.

    I think all the money I saved this year on rent should easily buy me this hardware.

    WML : Lord of the Custom Cases

    I am a little weird when it comes to organizing stuff. I am kind of like this dude in Chekhov’s “A Man in a Case”. I like cases. In particular, I like custom cases.

    For instance, if you purchase an expensive telescope, chances are it will come with a case. This case will be a box filled with a special kind of foam. This foam has a pre-cut silhouette of the scope and accessories. This way everything fits exactly.

    This reminds me of the Kazbek-U Soyuz spacecraft couches that are custom made for each cosmonaut.

    A chair made for Norman Thagard at the National Air and Space Museum.

    I’ve seen cooler chairs in a museum in Moscow when I was a child, probably from Salyut or maybe even Vostok missions, but I can’t find any references.

    Anyway, back to custom cases. I really want a case for my bedside table. It should hold my glasses, keys, wallet, watch and wedding ring. This may look comical, but is rather convenient. I can’t just leave all this stuff on the tabletop because Tilde the cat likes to play with things. Tilde already “disappeared” my nice titanium wedding ring. I don’t want to just put everything into a box because I don’t want my keys to scratch up my really, really expensive glasses.

    So anyway, the are three steps in making a custom case. Get a box. That’s easy. Get some foam. That’s a bit harder, but you can get it a good photo store like B&H or Adorama. Now comes the hard part. Cutting the foam.

    My first attempt failed miserably. I tried cutting the foam with a sharp blade, and I could not make any straight cuts. Then I tried to cut the foam with a hot knife. That generated a lot of stinky smoke and the results were not very good. But finally I found a solution on the Net.

    It’s really ingenious.
    What you need to do is soak the foam in water, wring it out and then freeze it. Frozen foam can be easily cut with a knife or drilled with a drill or a sharpened pipe.

    Here is the article.

    Of course, it’s best to use multiple layers of foam to create the relief effect like this: