How To Speed Up the Web (And Gain A little Privacy)

Let’s face it: Facebook “like buttons” are dragging the pageload speeds down. They are just the pits, and they are slow mostly because the Great Zuck want to know what you are up to. Screw that – install WidgetBlock for Chrome, your pages will load faster, your browser will crash less, and Zuck will know less about you.

This has been a public service announcement. Also, don’t forget to back up – hard drives only live for a few years.

[update] I seem to be singling out Facebook buttons. And I do – they are the worst offenders in terms of performance. On the other hand Widgetblock works for all kinds of widgets.

Love,
Deadprogrammer

WML : Fasteners Are Engineer’s Best Friend

While we are on the subject of screws, here’s another thing that I learned about fasteners. As any know-it-all who pays attention to things like that I looked up why screws with what we called cross-shaped screws in the USSR are called Philips screws in the US (I wonder what they call them in other countries) are called so. Of course the answer was one web search away in the Straight Dope Classic Why did this guy Phillips think we needed a new type of screw?

I also purchased One Good Turn: A Natural History of the Screwdriver and the Screw used at Amazon. I learned that the screw and the screwdriver is a rather recent invention, interestigly enough one of the very few tools not known to the ancient Chinese.

Useless trivia aside, I hate both slotted and Phillips screws. Of course I would not even think of using slotted screws for anything other than period-correct Craftsman style or Art Deco hardware such as cabinet pulls or outlet covers. But the common Phillips screws, with their falling off from the bit (even the magnetic one) and stripping (not the good bachelor party kind) drive me absolutely nuts.

The solution? I bought a couple of boxes of hybrid Phillips/square screws from Rockler. You can use the regular Philips driver, or you can use a special square one. The benefit of a square bit is that the screw does not fall of the bit and does not strip easily. The kit also includes a bottle of suggestively named Rockler Screw-Lube. The paper box is rather sucky and unusable – the partitions lift up and the screws mix.

WML : Mr. Squeek No More

Here’s yet another edition of WML – What Michael Learned. And the subject of today’s post is one of the things that I hate as much as I love hardwood parquet floors – squeaks. In SAT-speak I am somewhat corpulent and nocturnal. And a sonorous squeak of a parquet floor in the dead of the night is not one of my favorite sounds. I am certainly not one of those people who think that squeakiness adds character to an old floor.

A few years ago I searched for a way to repair squeaky floors and kept finding advice for those who could access the floor from below – in cases of houses with basements that expose the underside of the upper floors. Then recently I found a solution in an episode of Ask This Old House that works for me. It is marketed as “Squeeeeek No More“. That’s right – 5 e’s. Luckily Google suggests the “correct” spelling even if you use less e’s.

I bought my kit over here. It came with 50 snap-off screws, a square driver bit, a special stud finder screw (he heh) and a depth control/snap-off tool that looks like a Klingon weapon or instrument of torture.

Here’s how it works :

First of all you shoo away the cat (7). Then you need to find a parquet plank that squeaks. You do that by first finding the general location of the squeek and then with your foot sideways pressing on individual planks. Usually it’s only one or two loose planks that generate the noise when they move. Each one of the planks is nailed individually and it’s the nails that make the sound . You don’t need to worry about finding a stud – just drill a few pilot holes (so that the wood won’t split). Then using the square driver bit (1) you drive the screw (2) a few turns into the pilot hole. Then you drop a depth tool (3) over the top of the screw and continue driving the screw into the floor with the driver bit. The driver bit has a fat section at the bottom which will prevent it from driving the screw further than necessary when used with the depth tool.Then you use a T-shaped hole in the depth tool to gently break off the head of the screw (2a) by rocking it side to side. The screw will break off under the surface of the wood leaving a small hole (5) and (6) in the floor that can be filled in with wood repair sticks.

I found that it takes about three to five screws per squeaky plank. The Klingon device is not really necessary for parquet floors without carpets.  The screw breaks easily with the tool, and doesn’t when you screw it in. It would be a good idea to practice on some scrap wood (which I didn’t do of course), but I’ve had no accidental snapoffs so far. It would become a problem if the screw would break off above the surface. I guess the best way to fix that would be to pound the crew in with a nail set (which is not an easy matter for sure).  If you do not predrill the hole a split in the plank would not be an easy fix as well. On the plus side, the holes are not very visible even unfilled. I guess the best time to do this fix would be right before floor refinishing.

There is a cheaper version of the kit marketed as “Countersnap“, which seems to be exactly the same thing, except the depth/snap-off tool that comes with it can’t be used on carpets. Actually I think that’s the one I’ve seen Tommy use on Ask TOH.

Of course this system will not work for people with radiant floor heating, pipes and electric wires that run under the floor, super expensive museum quality floors with highly polished astronomical mirror grade finishes and landlords who do not allow driving screws into the wooden floors no matter how squeaky you or the floor gets.

Oh, right. 50 deadprogrammerTM points to the reader who can tell me the sci-fi author who inspired the title.

Great Fight With The Wall Warts and Holy Insurgency Against Wire Mayhem

Want to learn how to lower your electric bill and organize your power cords? Then .

Here is something I wanted to write up for while, but never had the time. But today I finished my book on my train ride to work, and now on my way back I have nothing to do, s I’ll write this up on my blackberry.

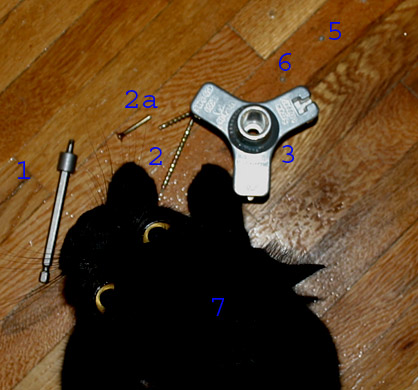
Remember, I used to bitch about high electric bills. Well, I think I found a way to reduce them. I found a culprit. Its name is Wall Wart. It’s also known as a power adapter, 12 volt transformer and #$%^ thing that takes up two outlets at the same time.

The sad fact is that most electronic appliances operate on a voltage that’s close to 12V. Since in US electrical grid mostly operates at 120V (a 240V line split into two) an a 120V to 12V transformer is needed.

Why isn’t there a separate 12 V line? Well, 12V electricity doesn’t travel well, so there is no way to pipe it directly from the power plant. And in any case, all the devices use current at different amperage, different jacks are needed and some devices have built in transformers. In one word – legacy issues. Two words. Anyway, back to the story. So what do I hate wall warts?

They are expensive. Did you ever try to buy a new charger for your cell phone? They cost a fortune. Without them electronics would be much cheaper.

They consume from 1 to 20 Watts in standby mode. Here is an article about that. There are between 20 and 30 wall warts in my apartment. And they are hungry.

They use up outlets.

Their thin wires create a mess, the plugs that go into the device often pop out inconveniently.

They generate heat.

They are ugly.

I hate them. I looked in vain for a universal power supply that would be able to feed all the devices, but I could not find any (same story with the personal power meter btw.)

Well, my solution is pretty simple. I went out and bought a bunch of power strips (ones with fat slots for wall warts). Then the hard part – I rounded up all the wall warts. I found a few from devices that I no longer used. Those went to my junk box.

Then I separated the wall warts that should always be on (phone and answering machine) and plugged them into their own strip. My computer and all devices connected to it went onto a second power strip. My wife’s computer and it devices went onto the third. I’ve done the same thing with the entertainment center. Tivo and cable box went onto one strip, everything else – onto another.

Whew. Now I turn off all the unnecessary devices at once. And the bill for last month was $20 lower than the one for the same month a year ago. Of course it’s not a good way to compare, but I’ll keep checking.

And if you read this far, here is a bonus rant. Did you ever try to mount a power strip on a wall? Most power strips have these nasty little keyholes on the back. You are supposed to make a paper template, screw in 2 or four screws and hang the power strip on those. There is no margin for error there. The screws must have correctly sized heads, must line up precisely, and be at the right angle with the wall. Of course, when you hang the strip it will look skewed. And when you’ll hang it straight, the screws will pop out of the sheetrock wall when you pull on it. Aaaaaaaargh.

Now to the solution. At first I experimented with drilling holes. That way I could just mount it on the wall with a few screws through the body of the strip. Well, it doesn’t work on all strips. On most I would have to drill diagonal holes or risk destroying the wiring.

The final solution is simple: I epoxy two pieces of hard plastic to the back of the strip, leaving a few inches sticking out. Drill two holes through that – and voila – instant hanging brackets.